At almost 1000 QSOs with FT8 using WSJT-X I thought I’d share a quick set up guide and some tips.

I won’t go into TX here, only RX for now.
At almost 1000 QSOs with FT8 using WSJT-X I thought I’d share a quick set up guide and some tips.

I won’t go into TX here, only RX for now.
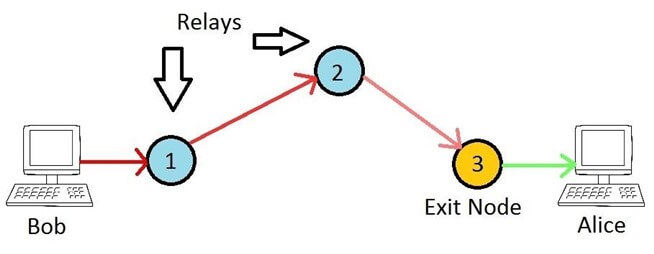
This will be a quick tutorial on how to configure an Exit Node for the Tor Network. Doing this comes with some inherent risks for the operator but exit nodes are essential for bridging Tor with the ‘clear net’. Without exit nodes, anyone suffering from ISP filtering or those not wishing to have their Internet activity logged (BBC Article) couldn’t utilise Tor to access the Internet.

Unlike bridges, exit nodes (and normal relays) are publicly known devices, for which their IP address and configuration is available for anyone to see. They effectively make the final connection to the destination on behalf of the originating (anonymous) client. The Tor network is drastically short of exit nodes, but for good reason. Because they are the final hop in the chain, they will be making hundreds of outbound connections to whatever website or service Tor users request. It is therefore easy for the powers who be to blame an exit node operator for ‘doing bad things’ when in fact their node is merely participating in a network, much like a traditional router would in any network. Anyway, assuming you have balls of steel and willing to run an exit node I’ll take a look at how to do this with least hassle as possible.
Tor (‘The Onion Router’) is by far the most popular solution for anonymous browsing, with over 6000 relays and 2.5 million active users. I’m going to look at how to configure Tor on your network, in a variety of ways. The so called ‘Dark Web’ seems to get a bad press, maybe because of illegal sites like Silkroad, but it’s actually an invaluable resource for citizens or visitors to countries who have severe Internet censorship (including the UK!). Even Facebook has a .onion address, as does the DuckDuckGo search engine and Aphex Twin’s ‘Syro’ album.

By far the simplest and most secure way of using Tor is to install the Tor Browser. It’s dead simple and takes literally a few minutes. However, depending on your goal, there are other ways to use Tor. I’m going to look at a few ways to deploy Tor, including the pros and cons of each. These are:
As the UK government have announced they wish to classify Internet access as a public utility (implying it shouldn’t be a privilege but should be more like electricity etc) I thought I’d share how I have opened my Internet connection for anyone to use. As long as you can receive the signal you can connect and browse to your heart’s content without any keys or passwords.

Firstly, this is against the T&C’s of most ISPs, including mine. There’s a few (il)logical reasons for that but it’s mainly revenue protection. Even though they know a single connection would be perfectly suitable for many households to share, they would obviously lose money if everyone did that. Namely because, unlike other utilities, Internet access is generally not metered, meaning it’s a fixed cost per household per month. If your neighbour cannot afford their own Internet access or for whatever reason cannot get a contract then I feel it’s only fair to allow them to use mine. With talk of some people not being able to afford heating during the winter it’s hardly appropriate to expect them to also afford broadband. Who needs Internet access though? I mean it’s not like online shopping is generally cheaper or anything, not to mention almost everything is moving towards e-billing, right?
I’m not going to suggest everyone should just blindly open up their WiFi router for anyone to use but here’s how I’ve achieved this safely.
FreePBX is an opensource front-end for the Asterisk VoIP solution. It can be installed on a Raspberry Pi via a prebuilt image but what if you want to use it directly on Raspbian (or other distros)? Well, it is possible with a few minor tweaks.

Because FreePBX and Asterisk are tightly bound it is a permissions nightmare to get the web interface to work with any other user than ‘asterisk’. If you already have Apache running for other purposes then this is obviously not ideal. For this reason we need to get second Apache process running as the ‘asterisk’ user, while at the same time allowing the main Apache process to run as is. Here’s how you do that.
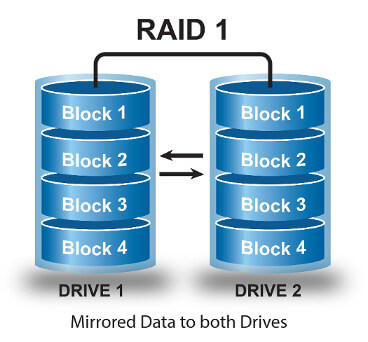
There are many tutorials on rebuilding Linux Software RAID but most are unnecessarily overly complicated. It’s fairly straight forward – here’s how.

Unlike hardware RAID, software RAID is all handled by the operating system itself. This means the process of replication, rebuilding and control is performed by the filesystem with various kernel and userspace software.
After posting how great Tarsnap is I thought it only fair to write a ‘how to install Tarnsap on Linux’ article, so here goes.
Sign up for an account
This is the easiest part, simply create an account at Tarsnap.com and verify your e-mail address. You will need to ‘top up’ your account with at least 5 American Pasos to actually get started so may as well do that right away. I used Paypal as it makes me feel safe and when I feel safe I sleep better at night.
Once you have an account balance there’s actually not much else to do via the website; the rest is all command line goodness.
Download and Compile the Source Code
I’m going to do the rest as the ‘root’ user. If you’re not feeling as brave you may wish to prefix every command with ‘sudo’ as your normal user – for some reason Ubuntu et al seem to love doing this.
At the time of writing version 1.0.36.1 was the latest.
First up lets get root and change to /tmp and then download the tarball:
sudo -i
cd /tmp/
wget https://www.tarsnap.com/download/tarsnap-autoconf-1.0.36.1.tgz