How To Create a Tor Exit Node

This will be a quick tutorial on how to configure an Exit Node for the Tor Network. Doing this comes with some inherent risks for the operator but exit nodes are essential for bridging Tor with the ‘clear net’. Without exit nodes, anyone suffering from ISP filtering or those not wishing to have their Internet activity logged (BBC Article) couldn’t utilise Tor to access the Internet.

tor-exit

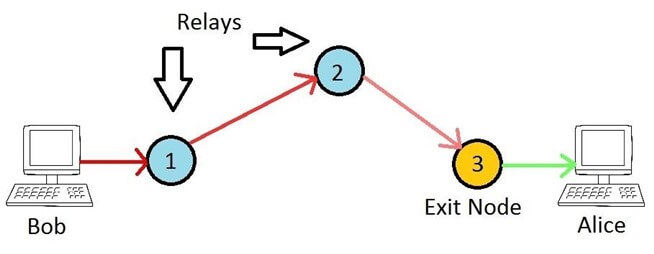
Unlike bridges, exit nodes (and normal relays) are publicly known devices, for which their IP address and configuration is available for anyone to see. They effectively make the final connection to the destination on behalf of the originating (anonymous) client. The Tor network is drastically short of exit nodes, but for good reason. Because they are the final hop in the chain, they will be making hundreds of outbound connections to whatever website or service Tor users request. It is therefore easy for the powers who be to blame an exit node operator for ‘doing bad things’ when in fact their node is merely participating in a network, much like a traditional router would in any network. Anyway, assuming you have balls of steel and willing to run an exit node I’ll take a look at how to do this with least hassle as possible.

Read More »

How To: FreePBX on Raspbian

FreePBX is an opensource front-end for the Asterisk VoIP solution. It can be installed on a Raspberry Pi via a prebuilt image but what if you want to use it directly on Raspbian (or other distros)? Well, it is possible with a few minor tweaks.

FreePBX

Because FreePBX and Asterisk are tightly bound it is a permissions nightmare to get the web interface to work with any other user than ‘asterisk’. If you already have Apache running for other purposes then this is obviously not ideal. For this reason we need to get second Apache process running as the ‘asterisk’ user, while at the same time allowing the main Apache process to run as is. Here’s how you do that.

Read More »

How To: Install Tarsnap on Linux

After posting how great Tarsnap is I thought it only fair to write a ‘how to install Tarnsap on Linux’ article, so here goes.

Sign up for an account

This is the easiest part, simply create an account at Tarsnap.com and verify your e-mail address. You will need to ‘top up’ your account with at least 5 American Pasos to actually get started so may as well do that right away. I used Paypal as it makes me feel safe and when I feel safe I sleep better at night.

Once you have an account balance there’s actually not much else to do via the website; the rest is all command line goodness.

Download and Compile the Source Code

I’m going to do the rest as the ‘root’ user. If you’re not feeling as brave you may wish to prefix every command with ‘sudo’ as your normal user – for some reason Ubuntu et al seem to love doing this.

At the time of writing version 1.0.36.1 was the latest.

First up lets get root and change to /tmp and then download the tarball:

sudo -i
cd /tmp/
wget https://www.tarsnap.com/download/tarsnap-autoconf-1.0.36.1.tgz

tarsnap1

Read More »