Tor (‘The Onion Router’) is by far the most popular solution for anonymous browsing, with over 6000 relays and 2.5 million active users. I’m going to look at how to configure Tor on your network, in a variety of ways. The so called ‘Dark Web’ seems to get a bad press, maybe because of illegal sites like Silkroad, but it’s actually an invaluable resource for citizens or visitors to countries who have severe Internet censorship (including the UK!). Even Facebook has a .onion address, as does the DuckDuckGo search engine and Aphex Twin’s ‘Syro’ album.
![]()
By far the simplest and most secure way of using Tor is to install the Tor Browser. It’s dead simple and takes literally a few minutes. However, depending on your goal, there are other ways to use Tor. I’m going to look at a few ways to deploy Tor, including the pros and cons of each. These are:
- Using the Tor Browser Bundle
- Configuring a Tor SOCKS proxy
- Creating a transparent Tor network
Tor Browser
From the outset let me make it clear using the Browser Bundle is by far the safest way to take advantage of Tor. The other methods are useful for experimentation when you understand the implications.
The Tor Browser bundle can be downloaded from torproject.org and will provide you with both a circuit into the Tor network and a secure Internet browser.
Pros:
- Easy to install on almost any OS
- Zero configuration required
- Provides client-to-relay encryption
- Browser is secure (javascript disabled, no logging etc)
Cons:
- Only secure for browsing sites directly in the browser, nothing external from the browser
- Some websites will not work because of the browser configuration
- Browser requires regular manual updates
- Needs to be installed on every device you use
In other words, the Tor Browser bundle provides a secure web browser connected to Tor, but does not ensure any other traffic from your machine is secure and anonymous.
Important – Using the following methods (i.e. not using the Tor Browser) have privacy limitations, due to the fact that the Tor Browser contains many modifications. Various plugins can overcome some issues. HTTPS Everywhere and NoScript are two such examples. Do some research.
Shared Tor SOCKS Proxy
Another way of using Tor is to make a SOCKS proxy available on your network for any device to use. This is quite handy, if for example, you want to be able to access .onion sites or to switch between the normal Internet and Tor in your every day browser.
Using a proxy switcher, such as SwitchySharp for Chrome, can enable you to view .onion sites without needing the Tor Browser. It’s also useful if you want to visit a particular site anonymously or bypass ISP restriction.
Pros:
- Provides any device on the network access to Tor (including .onion sites)
- Allows you to use your favourite browser
- Provides anonymous browsing and bypasses any ISP filtering
- Easy-ish installation (providing you’re comfortable with Linux)
Cons:
- Does not provide client-to-relay encryption*
- Browser configuration required**
- Is susceptible to DNS leakage***
- Does not anonymise all client traffic (only software configured to use the proxy)****
*Instead of client-to-relay encryption, which you get from running Tor software on each client, you will only get encryption from the SOCKS server to the relay. Generally this isn’t an issue, especially on a home network. I would go as far to say that for wired clients this is a non-issue at home but for wireless clients be aware that the traffic is only as secure as your wireless connection. This is especially important for .onion sites as most do not use SSL (HTTPS). Facebook’s .onion site does use SSL but that’s an exception to the rule. The ‘HTTPS Everywhere‘ plugin helps with this for many major websites. Even for wireless clients I wouldn’t be too worried though, any tracking by ‘the evil’ is going to be performed somewhere out on the Internet, rather than someone in a car outside your house snooping your wireless traffic.
**As well as HTTPS Everywhere, NoScript should also be installed.
*** Within proxy settings ‘use remote DNS’ should be enabled whenever possible.
**** Some programs even ignore system proxy settings, such as Skype.
When the Tor Browser bundle is installed what it’s actually doing is configuring a SOCKS proxy locally and the browser is preconfigured to use that proxy. What we’re doing here is making that proxy available for any device on the network.
I’ve used by RPi for this but any Linux box will do the trick.
Install ‘tor’ package.
root@pi:~# apt-get install tor
Make the configuration in /etc/tor/torrc. Replace ‘192.168.0.1’ (SocksListenAddress) with the LAN IP address of your device.
root@pi:~# cat /etc/tor/torrc

VirtualAddrNetwork 10.192.0.0/10
AutomapHostsOnResolve 1
SOCKSPort 9050
SocksListenAddress 192.168.0.1
Restart Tor:
root@pi:~# /etc/init.d/tor restart
[ ok ] Stopping tor daemon...done.
[ ok ] Starting tor daemon...done.
It really is as simple as that. Lets just quickly check the SOCKS server is listening.
root@pi:~# netstat -nlp |grep 9050
tcp        0      0 192.168.0.1:9050        0.0.0.0:*               LISTEN      5070/tor
We can see we now have port 9050 listening for SOCKS connections on our private LAN. Next to configure a client.
I quite like the SwitchySharp Chrome plugin for this but you could do it manually or use any other proxy switching plugin. Once SwitchySharp is installed, click the logo which now appears next to the address bar and go to options. Add a new profile with the following details, changing the IP to your server’s IP.
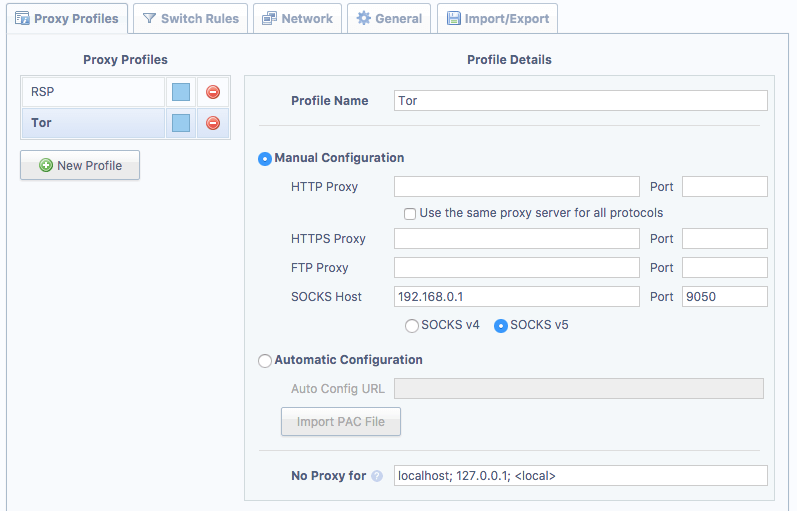
Note: It is important you select ‘SOCKS v5’, otherwise DNS resolution is performed by the client OS rather than the Tor proxy. Slight edit here – selecting v5 doesn’t guarantee anything. What you actually want is ‘use remote DNS’ which SwitchySharp doesn’t appear to support. That said, onion addresses do work which suggests it must be using the proxy for DNS so I’m a little confused here – maybe it’s browser specific. Anyway, if DNS is not performed by the proxy it means DNS queries can be logged by the ISP and also .onion addresses won’t work (as they relay on the Tor network itself, more about that in another article).
Next we add a rule which forces all .onion addresses to use the proxy. Go to the ‘Switch Rules’ tab and add a new rule.
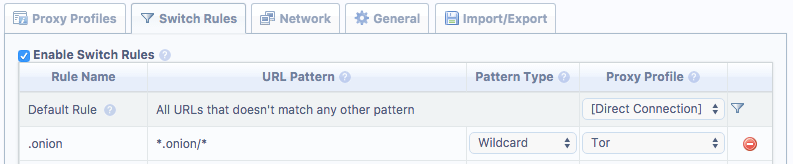
Ensure the URL Pattern is exactly as above and that ‘Enable Switch Rules’ is ticked.
You can also add other rules for non-onion sites if you wish. You may, for example, want to always use Tor for Twitter. In that case add ‘*twitter.com/*’ as the URL pattern.
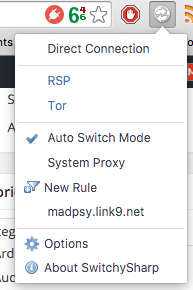
That’s all there is to it. Now, whenever you visit a .onion site it will direct the request through the proxy. You can also choose to use Tor for all browsing whenever you want by clicking the SwitchySharp icon and selecting ‘Tor’. Once you’re done make sure you reselect ‘Auto Switch Mode’ otherwise .onion sites (and any other rules you added) won’t automatically use Tor.
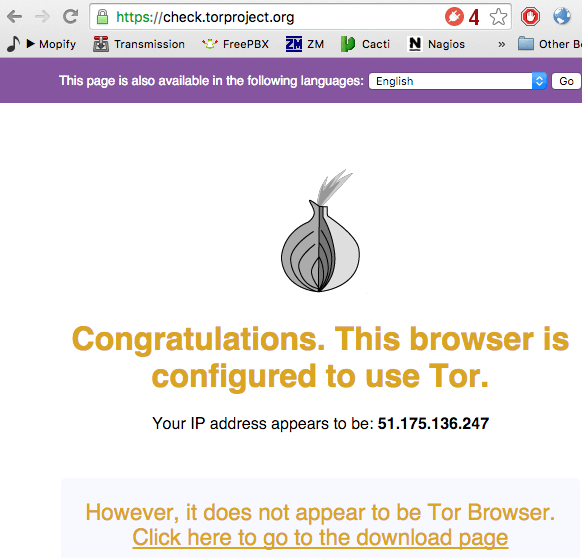
You can test this works by selecting the Tor proxy then navigate to https://check.torproject.org/
Note the warning about not using the Tor Browser – that’s what we are expecting to see. Although arguably not as safe as the Tor Browser, you can use Chrome’s Incognito window if you don’t want to keep any history.
Like i’ve mentioned above, when using this method you are not achieving the same as using the Tor Browser but it does have its uses, such as if you just want to browse anonymously and/or bypass any ISP filtering. Being able to access .onion sites is handy too.
Transparent Tor Proxy
The final method I’m going to talk about is using Tor as a transparent proxy on your network. This is a really interesting way to do things as it forces all traffic from a client out via the Tor circuit. With the correct browser configuration (HTTPS Everywhere/NoScript plugins etc) you could argue this is the most secure way to use Tor.
There are a few limitations to this method though. Because Tor only handles TCP traffic, you won’t be able to use anything which requires UDP. You could configure NAT and allow outbound UDP if you wish, but that somewhat ruins the main advantage of this method – ensuring all outbound traffic is via Tor.
Pros:
- All client traffic is routed via Tor
- Zero client software configuration required
- No leakage of traffic via ISP (including DNS, no matter what nameservers are configured on the client)
- +All pros of the proxy method above
Cons:
- Does not provide client-to-relay encryption*
- UDP-reliant software will not work (except DNS)
- Requires a separate network segment or manual client IP settings
- Slightly more complicated to configure
Lets get straight into how this is done. First up we need a machine which is going to act as the default gateway for all clients. Just like for the proxy method we need to install Tor.
root@pi:~# apt-get install tor
Next, create the configuration in /etc/tor/torrc. Replace ‘192.168.0.1’ (*ListenAddress) with the LAN IP address of your device. It must be the IP which is on the interface specified in the iptables rules added further below.
root@pi:~# cat /etc/tor/torrc

VirtualAddrNetwork 10.192.0.0/10
AutomapHostsOnResolve 1
TransPort 9040
TransListenAddress 192.168.0.1
DNSPort 5353
DNSListenAddress 192.168.0.1
#ExitNodes {us},{gb}
(Note the hashed out ‘ExitNodes’ line – you can unhash this if you want to specify what countries the exist nodes should be in.)
Then restart Tor:
root@pi:~# /etc/init.d/tor restart
[ ok ] Stopping tor daemon...done.
[ ok ] Starting tor daemon...done.
We need to ensure there will be no leakage of traffic, therefore we need to ensure that ip_forward is disabled and there are no NAT rules.
root@pi:~# cat /proc/sys/net/ipv4/ip_forward
0
If that is ‘1’ then find out why, usually because it’s been enabled via sysctl (check /etc/sysctl.conf for net.ipv4.ip_forward).
Also check there are no NAT’ing rules in place. Every chain should be empty.
root@pi:~# iptables -L -n -t nat
Chain PREROUTING (policy ACCEPT)
target     prot opt source               destination

Chain INPUT (policy ACCEPT)
target     prot opt source               destination

Chain OUTPUT (policy ACCEPT)
target     prot opt source               destination

Chain POSTROUTING (policy ACCEPT)
target     prot opt source               destination
Next we’re going to add two REDIRECT rules to the PREROUTING chain. These do two things.
First rule redirects all DNS traffic to the Tor DNS server. Replace ‘eth1’ to whatever your LAN interface is.
iptables -t nat -A PREROUTING -i eth1 -p udp --dport 53 -j REDIRECT --to-ports 5353
Second rule redirects all TCP traffic to the Tor’s transparent proxy port. Replace ‘eth1’ to whatever your LAN interface is.
iptables -t nat -A PREROUTING -i eth1 -p tcp -m tcp --tcp-flags FIN,SYN,RST,ACK SYN -j REDIRECT --to-ports 9040
That’s pretty much it for the main Tor server configuration. The next step is how we handle DHCP.
You could install a DHCP server on the same box as Tor if you wish. You just need to make sure the Router and DNS servers are set to the LAN IP of our Tor server (in the example that’s 192.168.0.1). However I did it using my Edgerouter, so lets see how that looks in EdgeOS land. The Edgerouter’s IP on this interface is .254 as the RPi has .1
admin@edgerouter# show interfaces ethernet eth1
 address 192.168.0.254/24
 description "Tor - Pi is the router (.1) set by DHCP"
 firewall {
     in {
         name drop-all
     }
     local {
         name basic1
     }
     out {
         name drop-all
     }
 }
admin@edgerouter# show service dhcp-server shared-network-name Tor
 authoritative disable
 subnet 192.168.0.0/24 {
     default-router 192.168.0.1
     dns-server 192.168.0.1
     lease 86400
     start 192.168.0.10 {
         stop 192.168.0.50
     }
 }
As the Edgerouter is not the gateway (or DNS server etc) you can safely add fully dropped firewalls to all the interfaces. Just ensure DHCP is permitted.
What we now have is a transparent Tor proxy running on .1 which will redirect all TCP and DNS traffic to the proxy ports. We have a DHCP server running on .254 which sets the default gateway and DNS server of any client to the Tor proxy server (.1). We ensured that the Tor proxy server will not forward/NAT any other packets to prevent leakage. Even if the client (or random software on the client) chooses to ignore DHCP for the DNS server, because the gateway is our Tor Proxy running the port 53 redirect rule, all DNS queries will be processed by Tor.
In reality what I did was configure a new VLAN for this purpose and created a new SSID on the access point. That way I can easily switch between networks from any device.
As with the ‘manual’ proxy method mentioned previously, you still need to ensure your browser is sane. Do some research into this but as examples, ‘HTTPS Everywhere’ and ‘NoScript’ plugins are a good start. Using incognito mode might be sensible, depending on what you want to achieve.
You can test the configuration by connecting to the network and browsing to https://check.torproject.org/
I’ll be writing a couple more articles about Tor, including how to create a hidden service. For now though have fun getting Tor up and running on your network!
Excellent article. May want to look out for recent updates though, there have been a few changes.