After the successful first project of getting a PIR sensor to work with Arduino I thought I’d try something a bit more practical and bespoke. The idea with this is you can use the Arduino to change the colour of an LED if there are any critical or warning errors in Nagios Monitoring software.
![]()
This time we’re going to get the Arduino to read input over its USB serial interface from a Raspverry Pi and depending on what it receives either make the LED light green or red.
The schematic here is exactly the same as a standard single colour LED except the LED has 3 pins – red, green and ground. The diagram shows an RGB LED but the principle is the same.
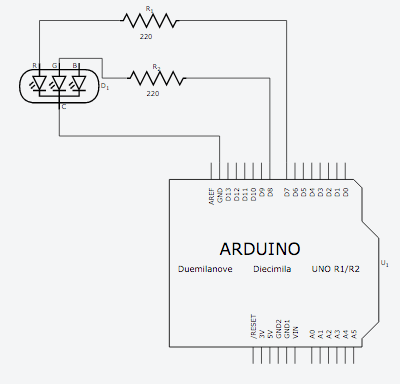
This means the LED also has a third colour – a crappy yellow but I didn’t bother using that as you’ll see below.
The Arduino talks serial over USB, this is used not only to program it but also to read and write data while a program is running. What is really handy about this is not only can the USB be used to power it from a Raspberry Pi but also we can script anything on the Pi to read and write to the Arduino.
You may be thinking ‘but the Pi can do this, it has GPIOs!’ – yes it does, but my Pi is happy in its little box, untouched. You may also be thinking ‘the Arduino has network modules!’ – yes it does, but my Pi already has perfect networking capability. Just thought I’d clear that up.
First up, here’s the simple code for the Arduino. It will read a value after the letter ‘N’ and either turn the LED a steady green if the value is zero or will blink red if anything else.
// the setup function runs once when you press reset or power the board
void setup() {
  // initialize digital pins 7 & 8 as an output.
  pinMode(7, OUTPUT);
  pinMode(8, OUTPUT);
  Serial.begin(9600);
}

int green = 7;
int red = 8;
int state;
int current;

void loop() {
  if (Serial.available() > 0) {
    while (Serial.peek() == 'N') { //check for the character that signifies that this will be a command
      Serial.read(); //remove the L off the serial buffer
      state = Serial.parseInt(); //store our expected integer into state
      Serial.read();
      if (state == 0) {
        digitalWrite(green,HIGH);
        digitalWrite(red,LOW);
        //Serial.print(state);
        Serial.print("Nagios OK\n");
      } else {
        Serial.print("Nagios NOT OK\n");
      }
  }
 }
 while (Serial.available() == 0) {
  if (state != 0) {
        digitalWrite(green,LOW);
        digitalWrite(red,LOW);
        delay(500);
        digitalWrite(green,LOW);
        digitalWrite(red,HIGH);
        delay(500);
   }
  }
 }
If you run this via the Arduino IDE and bring up the ‘Serial Monitor’ from the Tools menu you will be able to test it.
Just send it ‘N0’ (that’s a zero by the way) and the LED should come on green. Send it ‘N1’ and it should blink red. This means it’s working as expected.
The next part is to plug it into the Pi. Once plugged in you should see in ‘dmesg’ something like this:
[1804622.124890] usb 1-1.3.3: new full-speed USB device number 11 using dwc_otg
[1804622.258901] usb 1-1.3.3: New USB device found, idVendor=2341, idProduct=0043
[1804622.258929] usb 1-1.3.3: New USB device strings: Mfr=1, Product=2, SerialNumber=220
[1804622.258943] usb 1-1.3.3: Manufacturer: Arduino (www.arduino.cc)
[1804622.258956] usb 1-1.3.3: SerialNumber: 854393131303513041E2
[1804622.588710] cdc_acm 1-1.3.3:1.0: ttyACM0: USB ACM device
[1804622.589749] usbcore: registered new interface driver cdc_acm
[1804622.589764] cdc_acm: USB Abstract Control Model driver for USB modems and ISDN adapters
We now know that our serial interface is doing to be /dev/ttyACM0.
To test the idea I could read from Nagios and change the colour of the LED I came up with this quick and dirty bash script.
#!/bin/bash
cat /dev/ttyACM0 > /dev/null &
while true
 do
  STATUS=$(grep current_state /var/cache/nagios3/status.dat |sort -rn |uniq |awk -F '=' {'print $2'} |head -n1)
  echo -n N$STATUS > /dev/ttyACM0
  echo $STATUS
  sleep 60
done
She ain’t pretty but she works. You’ll notice at the start there is a ‘cat’ which gets forked. If you don’t do this any time you ‘echo’ something to the serial device it will trigger the Arduino to perform a serial port reset. This is not what you need in your life.
The grep of status.dat is all that is needed to find the highest value from it. With Nagios a status of zero means ‘OK’, 1 is warning and 2 is critical. Therefore if everything is ‘OK’ it will return zero and pass that, via serial, to the Arduino (prefixed with ‘N’) which in turn will light the LED green. If anything is either warning or critical the value will not be zero and therefore will hit the ‘else’ condition in our Arduino program and blink the LED red.
When you execute the script it will also output to stdout just to you can see what’s happening. With any luck you should see some LED action. If you want to trigger a fake non-OK status you can submit a passive check result to Nagios.
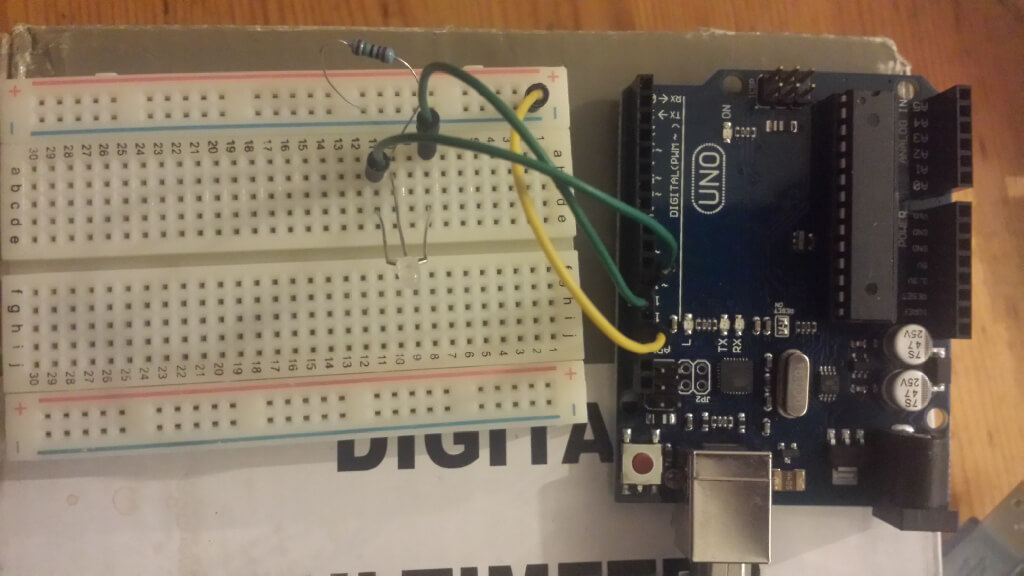
Here’s a crap photo of how it is wired up. slight difference to the diagram above is there’s a single resistor on ground.