This will be a quick tutorial on how to configure an Exit Node for the Tor Network. Doing this comes with some inherent risks for the operator but exit nodes are essential for bridging Tor with the ‘clear net’. Without exit nodes, anyone suffering from ISP filtering or those not wishing to have their Internet activity logged (BBC Article) couldn’t utilise Tor to access the Internet.
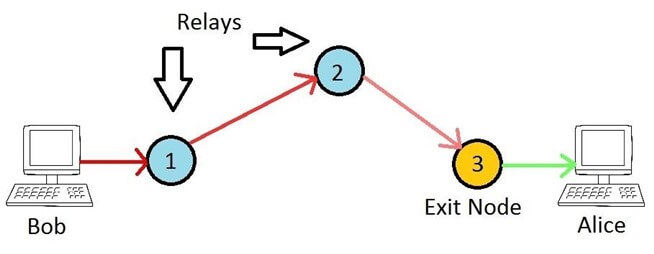
Unlike bridges, exit nodes (and normal relays) are publicly known devices, for which their IP address and configuration is available for anyone to see. They effectively make the final connection to the destination on behalf of the originating (anonymous) client. The Tor network is drastically short of exit nodes, but for good reason. Because they are the final hop in the chain, they will be making hundreds of outbound connections to whatever website or service Tor users request. It is therefore easy for the powers who be to blame an exit node operator for ‘doing bad things’ when in fact their node is merely participating in a network, much like a traditional router would in any network. Anyway, assuming you have balls of steel and willing to run an exit node I’ll take a look at how to do this with least hassle as possible.
Before we begin, let me make it clear running this from home is possibly dangerous, due to harassment from ISPs and the powers that be. Although you are not breaking any law by doing this you are acting as the exit point for Tor traffic and you have no control over what any of the 2.5 million Tor users across the world are going to be doing. If you do experience harassment, stay calm and know you have done nothing wrong. There is lots of information out there to help you if required.
Another issue you may face is one of reputation. Some websites block exit nodes and others make Captcha a requirement (such as cloudflare CDN & Google if it sees lots of traffic).
First up lets assume you have a working Linux machine, I’ll go with Ubuntu 14.04 (Trusty). Secondly lets assume you are NAT’ed behind a bog standard router.
We need to install tor and tor-arm. To do we need to add the Tor repos:
echo 'deb http://deb.torproject.org/torproject.org trusty main' >> /etc/apt/sources.list
echo 'deb-src http://deb.torproject.org/torproject.org trusty main' >> /etc/apt/sources.list
Next, install the GPG keys for the repo:
gpg --keyserver keys.gnupg.net --recv 886DDD89
gpg --export A3C4F0F979CAA22CDBA8F512EE8CBC9E886DDD89 | sudo apt-key add -
Now install tor, tor-arm, curl, vnstat, nginx and socat:
apt-get update
apt-get install tor tor-arm vnstat vnstati nginx curl socat
Weyhey, Tor is installed. By default it acts as a client so we need to make it into an exit node.
Replace the contents of /etc/tor/torrc with a basic relay configuration.
curl -o /etc/tor/torrc https://madpsy.uk/wp-content/uploads/2015/11/torrc.txt
The sample configuration looks like this:
ORPort 127.0.0.1:9001 NoAdvertise
ORPort 443 NoListen
DirPort 9030
Nickname TorExit
RelayBandwidthRate 100 KB
RelayBandwidthBurst 100 KB
ContactInfo [email protected]
DisableDebuggerAttachment 0
ExitPolicy accept *:20-23     # FTP, SSH, telnet
...
...
ExitPolicy reject *:*
Edit /etc/tor/torrc and set your email address next to ‘ContactInfo’.
You may also wish to set ‘RelayBandwidthRate’ and ‘RelayBandwidthBurst’ to something else, depending on your Internet connection speed. The example value is 100 KB (Kilobytes Per Second) which is fine for a typical ADSL broadband connection. You will notice ‘DirPort’ is also set, enabling this node as a Directory Server – remove the line if you don’t want that.
Next, we need to run socat to redirect port 443 traffic to localhost port 9001. This is because a useful Entry Guard (the relay will accept incoming connections as well as being an exit node) needs to run on a port which is likely to be available for every Tor user. Port 443 is HTTPS so a sensible choice. The problem is Tor doesn’t run as root and will be denied permission when trying to bind to port 443. For this reason it’s bound to 9001 locally and we will redirect traffic using ‘socat’.
To run socat:
/usr/bin/socat TCP-LISTEN:443,fork,su=nobody TCP:127.0.0.1:9001 &
We need to ensure this starts on reboot so to do that we add it to root’s crontab.
echo '@reboot /usr/bin/socat TCP-LISTEN:443,fork,su=nobody TCP:127.0.0.1:9001 &' >> /var/spool/cron/crontabs/root
Almost done! Finally, we need to serve an ‘about this node’ page over HTTP so anyone querying what this node is will be able to find out.
Note: You can also do something similar with ‘DirPortFrontPage’, however I don’t believe it will let you add additional content easily (such as the bandwidth graph).
Replace the default nginx page with the official Tor Exit Node page.
curl -o /usr/share/nginx/html/index.html https://madpsy.uk/wp-content/uploads/2015/11/tor-exit-node.txt
curl -o /usr/share/nginx/html/how_tor_works_thumb.png https://madpsy.uk/wp-content/uploads/2015/11/how_tor_works_thumb.png
Edit /usr/share/nginx/html/index.html, find ‘[email protected]’ and replace with your actual e-mail address.
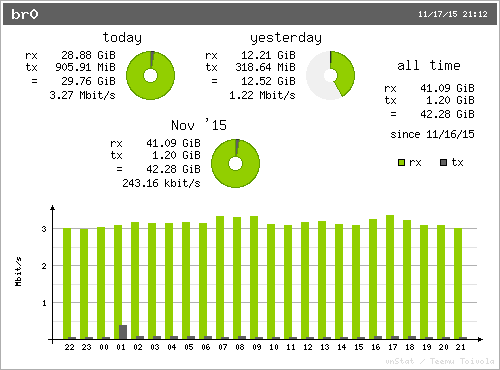
At the bottom of the page is a bandwidth graph for your node. To generate this we use ‘vnstat’. I will assume eth0 is your Internet interface. We need to add another cron for this.
First, run it once manually:
/usr/bin/vnstati -i eth0 -vs -o /usr/share/nginx/html/vnstat.png
Then add the cron so it runs on the hour, every hour:
echo '00 * * * * /usr/bin/vnstati -i eth0 -vs -o /usr/share/nginx/html/vnstat.png' >> /var/spool/cron/crontabs/root
You can now view this info page by browsing to your node’s IP in a browser (e.g. http://192.168.0.10). You should see the info page and the graph at the bottom. The info page and graph should look something like this:

The final stage (I promise) is to perform basic port forwarding on your router so HTTP, Tor Relay and Tor Directory are accessible from the Internet. If you don’t do this your Tor Exit Node/Relay is useless.
You want to forward TCP/80, TCP/443 and TCP/9030 to the IP address of your shiny new Tor Node – for example 192.168.0.10.
In case you don’t already know how to do this, it seems this site is uber useful: portforward.com
You can test this worked by browsing to your public IP address and make sure you see the same info page as before. In case you were wondering Tor handles dynamic IP addresses just fine, you don’t need to do anything with hostnames or DNS etc.
I did promise that was the last thing, which it basically was 🙂
One last thing! We must restart Tor so picks up our new configuration. We waited until after configuring port forwarding as one of the first thing Tor will do is make sure the port is open from the Internet.
To restart Tor, simply run:
/etc/init.d/tor restart
You can monitor what your node is up to with ‘arm’. Just run:
sudo -u debian-tor arm
At the top will be a ‘fingerprint’, something like ‘GH35AJCVH421742CCJFPQIUCB1835947B4399’.
You can use this fingerprint to search ‘Atlas‘ for details on your Node. Alternatively you can also search for your public IP address.
If you are running an exit node on a VM or dedicated server at a hosting company (much better idea than running from home) then it is also worth asking the hosting provider for a reverse DNS record for your IP address. I will assume you already have a domain name. Where xxx.xxx.xxxx.xxx is your server’s IP:
tor-exit1-readme.yourdomain.com A xxx.xxx.xxx.xxx
xxx.xxx.xxx.xxx.in-addr.arpa PTR tor-exit1-readme.yourdomain.com
This is so anyone looking up what your exit node’s IP is (from their logs etc) will likely spot the reverse record and try to view it in a browser – in which case they will see your Tor info page.
In addition to this it is worth while letting the hosting provider know what your server is going to be doing. That way, providing they are not idiots, they will understand why they may receive some complaints. There is not point in letting your home ISP know – they will likely either be clueless or tell you it’s against their T&C’s and terminate your account!
Essential Reading: For more information on how to safely run a Tor Exit Node, see this blog post.
I mentioned your relay will also be an Entry Guard. It will typically take 70+ days before your Node is a fully trusted Guard and working to its full potential. For more information on Entry Guard see this blog post.
